Tag: AWS

  • How to give access to specific users to specific buckets on AWS S3

    How to give access to specific users to specific buckets on AWS S3

    In AWS S3, you might want to provide the access to selected users to selected buckets. To provide the specific permissions you need to add a custom policy in IAM.

    Let’s learn,

    How to give permission to specific users to specific bucket?

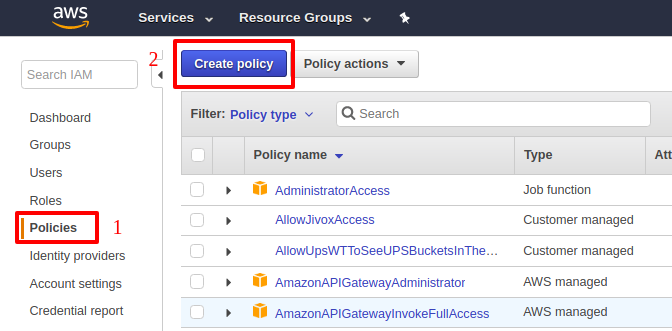
    After bucket creation in S3, Navigate to IAM management console and click on “Policies > Create Policy > then select “Create Your Own Policy"

    Fill the Policy Name and Description

    Fill below JSON to the Policy Document

    {
        "Version": "2012-10-17",
        "Statement": [
            {
                "Effect": "Allow",
                "Action": "s3:ListAllMyBuckets",
                "Resource": "arn:aws:s3:::*"
            },
            {
                "Effect": "Allow",
                "Action": [
                    "s3:*"
                ],
                "Resource": [
                    "arn:aws:s3:::your-bucket-name",
                    "arn:aws:s3:::your-bucket-name/*"
                ]
            }
        ]
    }

    In the above document, you can see that I have given access to list all the buckets – this is necessary, however I have given the full access on “your-bucket-name“.

    After this, click on the “Validate Policy“. After successful validation click on “Create Policy“. After successful creation of Policy, attach the policy to specific users.

    Tji

    This is how you can grant access of S3 bucket to specific users.

  • AWS – NDB – Ubuntu – Add separate location for MySQL temporary (tmp) storage

    AWS – NDB – Ubuntu – Add separate location for MySQL temporary (tmp) storage

    aws_mysql_disk_addition

    By default MySQL uses the system default location used for temporary file storage, which is usually /tmp/var/tmp, or /usr/tmp. In Ubuntu its /tmp. It’s good practice to specify separate location for MySQL, if you want to prevent System restart. If tmp location is on separate location then only MySQL restart will needed in case of any disk increase needed in future.

    Step 1: Create new EBS Volume by Login to Console and Click on EC2 Dashboard, then click on “Volumes”

    Step 2: Fill the details of Volume and click on create and the new Volume will be created within few seconds.


    Step 3: Attach the newly created volume to the Instance.

    Step 4: Check if the volume is attached or not by going to EC2 dashboard and clicking on that particular instance. You can also check by going to Volume stats as well.

    Step 5: Login to machine by your key or password.

    Step 6: Format Volume to ext4 and then mount it and make fstab entry as well.

    root@x:/mnt: lsblk
    NAME    MAJ:MIN RM   SIZE RO TYPE MOUNTPOINT
    xvda    202:0    0    40G  0 disk 
    └─xvda1 202:1    0    40G  0 part /
    xvdb    202:16   0   400G  0 disk /mnt/data
    xvdf    202:80   0   200G  0 disk 
    
    
    root@x: mkfs.ext4 /dev/xvdf
    mke2fs 1.42.9 (4-Feb-2014)
    Filesystem label=
    OS type: Linux
    Block size=4096 (log=2)
    Fragment size=4096 (log=2)
    Stride=0 blocks, Stripe width=0 blocks
    13107200 inodes, 52428800 blocks
    2621440 blocks (5.00%) reserved for the super user
    First data block=0
    Maximum filesystem blocks=4294967296
    1600 block groups
    32768 blocks per group, 32768 fragments per group
    8192 inodes per group
    Superblock backups stored on blocks: 
        32768, 98304, 163840, 229376, 294912, 819200, 884736, 1605632, 2654208, 
        4096000, 7962624, 11239424, 20480000, 23887872
    
    Allocating group tables: done                            
    Writing inode tables: done                            
    Creating journal (32768 blocks): done
    Writing superblocks and filesystem accounting information: done     
    
    
    root@x: mkdir /mnt/xvdf
    root@x:/mnt: sudo mount /dev/xvdf /mnt/xvdf/
    root@x: mkdir /mnt/xvdf/tmp_mysql
    root@x:/mnt/xvdf# chown -Rf mysql:mysql /mnt/xvdf/tmp_mysql
    root@x:/var: ln -s /mnt/xvdf/tmp_mysql/ /var/tmp_mysql
    

    Step 7: Now put the tmp_dir setting in /etc/my.cnf

    [mysqld]
    tmpdir = /var/tmp_mysql
    

    Step 8: Restart the MySQL and check for setting by Login to MySQL and executing below mentioned Query

    root@x:/: sudo service mysql restart


    mysql> SHOW VARIABLES LIKE 'tmpdir';

    This is how you can change the temporary directory in AWS hosted Ubuntu Linux environment.